Rendering Elda results with Velocity templates
Elda uses a renderer to generate output from the set of RDF resources that are selected by the input URL. Starting with version 1.3.0, Elda uses by default a renderer based on Apache Velocity to generate HTML output. This renderer is a complete re-write of the older, provisional Velocity renderer, and is not backwards compatible with the previous version.
In the remainder of this guide, we will show you:
- how to set-up and configure the Velocity renderer in the configuration code;
- how to customise the stylesheets to change the look and feel of the rendered output;
- how to customise the Velocity macros to change specific renderering behaviours;
- what’s available in the API provide to Velocity template developers.
What does a renderer do?
Elda uses the information from the URL, together with the configuration file, to generate SPARQL queries to the underlying triple store and select a set of RDF resource and their descriptions (i.e. sets of RDF properties). This resultset is returned to the requester in some format: JSON, XML, Turtle or an HTML web page. A renderer is the part of Elda that turns the resultset into the output format. The HTML renderer does that job to display HTML web pages. In previous versions of Elda, the default HTMl renderer used XSLT to convert the resultset to HTML. That renderer is still included in Elda, but since version 1.3.0 we have switch to using Velocity as the default HTML renderer.
Here is an example of a site that uses Velocity to render HTML pages:
Configuring and using the Velocity renderer
To use the Velocity renderer to generate HTML, attach this formatter to your API spec:
1
2
3
4
5
6
<yourSpec> api:defaultFormatter
  [a elda:VelocityFormatter ;
   api:name "html" ;
   api:mimeType "text/html" ;
   elda:className "com.epimorphics.lda.renderers.VelocityRendererFactory"
  ]
This will do two things: it will create an instance of a
VelocityRendering each time a resultset needs to be rendered into
HTML, and it will look for a template file (and associated assets) to
turn the VelocityRendering into HTML output. The root template file
is index.vm. Other than the name, the renderer makes no assumptions
about the root template, or what it does with the information in the
VelocityRendering. A standard template is provided in the Elda assets
project – you are free to use this standard template as-is, adapt
it to your needs, or ignore it and create your own Velocity templates
to meet your needs precisely. Guidance for customising the standard
template appear below.
What’s the difference between the VelocityRendering and the template?
Rendering a resultset into HTML using Elda’s Velocity renderer goes
through two stages. In the first, a VelocityRendering object is
created. This stage has two goals:
- to create a set of Java accessor objects, which provide a convenience API onto the elements of the resultset so that the template developer’s job is easier. For example, an Elda resultset frequently split up into manageable units that the LDA calls pages (the first 10 results, the second 10, etc). Page information is recorded into the RDF statements in the LDA resultset. To make this easier to use in a template, we provide a Java object
com.epimorphics.lda.renderers.common.Page. ThePageobject has direct API calls, such aspageNumber(),itemsPerPage()to make it easy to incorporate the information from the page description in RDF into a template - to unwind the graph into a tree-structure, suitable for display in an HTML document model or other tree-structured output notation.
Both of these jobs could have been achieved in the Velocity template
language, VTL. However, VTL has some limitations in terms of performance
and expressiveness, that make this harder. Moreover, by writing the
VelocityRendering objects in Java, it becomes much easier to write
unit tests to ensure correct, stable behaviour over time.
Configuration options
The Velocity renderer uses three api:variables in the configuration to specify non-default values for configuration options:
velocityTemplatefor the name of the root template file (default:index.vm)_resourceRootfor a path that should be prepended to assets, such as CSS stylesheets and JavaScript files_velocityPathfor a path on the server’s file system where the Velocity templates are found.
Example
Suppose you unpack the files from Elda assets into /var/www/elda/assets,
and that you arrange that all requests coming in to myEldaApp are forwarded
rom the front-end Apache or Nginx server to a Tomcat webapp container hosting Elda.
We need to supply both of these pieces of information to the Elda config,
so that the dynamically generated pages will contain the correct links:
1
2
3
4
5
6
7
8
9
10
11
12
13
14
<myEldaAppSpec> api:defaultFormatter
  [a elda:VelocityFormatter ;
   api:name "html" ;
   api:mimeType "text/html" ;
   elda:className "com.epimorphics.lda.renderers.VelocityRendererFactory" ;
   api:variable [
     api:name "_resourceRoot";
     api:value "/myEldaApp"
   ];
   api:variable [
     api:name "_velocityPath";
     api:value "/var/www/elda/assets"
   ]
  ]
The default value for _resourceRoot is /APP/lda-assets/ where APP is the application name, by default elda.
Now suppose that we would like to override some of the default behaviours
of the Velocity renderer. Velocity’s behaviour is to use the first definition
of a macro or partial that it finds, so our overrides have to be found before
the default files. We decide to put our locally customised assets into /var/www/myEldaApp/assets:
1
2
3
4
5
6
7
8
9
10
11
12
13
14
<myEldaAppSpec> api:defaultFormatter
  [a elda:VelocityFormatter ;
   api:name "html" ;
   api:mimeType "text/html" ;
   elda:className "com.epimorphics.lda.renderers.VelocityRendererFactory" ;
   api:variable [
     api:name "_resourceRoot";
     api:value "/myEldaApp"
   ];
   api:variable [
     api:name "_velocityPath";
     api:value "/var/www/myEldaApp/assets, /var/www/elda/assets"
   ]
  ]
Other notes
- You can choose to specify a Velocity formatter as a property of an endpoint rather than as the API-wide default.
- You can change the associated suffix of the formatter by changing the
value of its
api:nameproperty, and change the content-type of the generated page by changing the value of theapi:mimeTypeproperty.
The full velocity path
The configured _velocityPath isn’t the whole story about where Elda’s velocity renderings search for macro files. The full path that Elda uses is in order:
- the configured _velocityPath
- the directory
/etc/elda/conf.d/APP/_error_pages/velocity/ - the directory
_error_pages/velocity/in the webapp - the final fallback directory
velocity/in the webapp
The second and third entries exist for handling error pages.
Velocity properties
Velocity uses a set of configuration
properties
to control aspects of its internal behaviour. By default,
we leave all of these properties with their default values,
execpt that file.resource.loader.path is set to the path
given by _velocityPath. However, the renderer will look for a
velocity.properties file in the loader path, so you can override
any of the default Velocity configuration properties by creating a
velocity.properties file with appropriate keys and values. For example:
1
2
input.encoding = UTF-8
output.encoding = UTF-8
Customising the Velocity HTML renderer
The built-in renderer’s stylesheets and Velocity templates are intended to be a complete out-of-the-box solution for generating usable HTML pages from Elda results. However, in many cases it’s desirable to customise the output. Common examples include: changing the colour scheme to fit the look and feel of an existing site, and extending special behaviours to display certain kinds of RDF data in content-specific ways. We cover both of these cases below.
Customising the CSS stylesheets
All of the styling information for the HTML pages generated by the Velocity templates is handled by CSS stylesheets. Following best practice for CSS, there are no inline styles used in the generated pages.
In the Elda assets project, all of the relevant files can be found in the src/main/webapp directory (this follows the Apache Maven standard layout for web application projects). Within this directory, all of the files relevant to the Velocity renderer are in the velocity/ directory, and the stylesheets are in velocity/css. In here, you will find styles related to various elements of the standard layout generated by Elda’s Velocity renderer:
bootstrap.min.css,bootstrap-theme.min.css
By default, Elda’s HTML pages use the Bootstrap responsive design framework. Other Bootstrap themes can be downloaded from the internet.font-awesome.min.css
Provides a collection of useful icon glyphscodemirror.css,fold-gutter.css,jquery.datatables.min.css,qonsole.css
Used to support the SPARQL editing console used to view and run example SPARQL queries provided by Eldasite.css
Elda-specific styles
In general, site.css is first place to start when seeking to change the look and feel of Elda generated pages, although selecting a different Bootstrap theme might also be a good initial step for more radical changes.
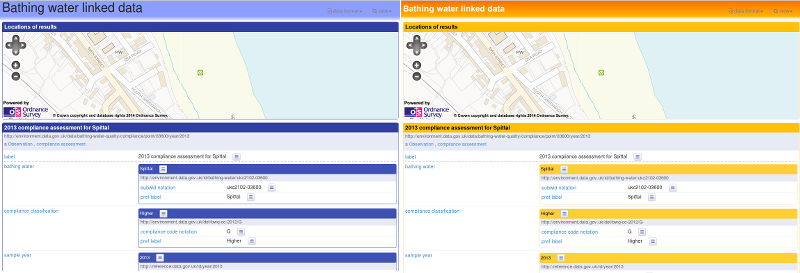
Example: changing the basic colour scheme
Elda’s default stylesheet uses a dark blue as a base colour. Let’s suppose that we want to change that to use an amber theme. Here are sample before and after screenshots of the change we want to make:
 </img>
Here is the CSS needed to change the colours of the outer and nested RDF resource labels, and the top navigation bar:
1
2
3
4
5
6
7
8
9
10
11
12
13
14
15
16
17
18
19
20
21
22
23
24
25
26
27
28
29
30
31
32
33
34
35
/* Colours for outermost resource labels */
h1.resource-label {
  background-color: #ffc107;
  color: #111;
}
section {
  border-color: #ffe082;
}

/* Colours for nested resource labels */
h3.resource-label {
  background-color: rgb( 255, 193, 7 );
  background-color: rgba(255, 193, 7, 0.8);
  color: #111;
}
.nested {
  border-color: #ffe082;
}

/* Navigation bar colours */
.navbar-default {
  background: linear-gradient(#ff6f00, #ffb300 80%, rgba(256, 256, 256, 0.3)) repeat scroll 0 0 rgba(0, 0, 0, 0);
}

.navbar h1 {
  font-size: 18pt;
  margin-top: 0;
  padding-top: 10px;
}

.navbar h1 a {
  color: white;
  vertical-align: top;
  font-weight: bold;
}
These CSS rules can simply be added to the site.css stylesheet that is deployed on your system. However, a disadvantage of this approach is that unpacking a new release of Elda assets onto your system risks overwriting your changes. Conversely, never updating Elda assets means that you risk not benefitting from the latest updates. A more robust method of incorporating the changed stylesheet can be achieved with a small change to the Velocity templates, as shown below.
Customising the Velocity templates
The default Velocity templates in Elda-assets are designed to be modular, so that it is easier for maintainers of Elda-based systems to customise the behaviour and appearance of the generated pages. In particular, some hooks are built-in in convenient places. For example, the template defining the header of the page reads:
1
2
3
4
5
6
7
8
9
10
11
12
13
14
15
16
17
18
19
20
21
<head>
  <meta charset="utf-8">
  <meta http-equiv="X-UA-Compatible" content="IE=edge,chrome=1">
  <title>$page.pageTitle()</title>
  <meta name="description" content="HTML rendering of Linked Data API results: $page.pageTitle()">
  <meta name="viewport" content="width=device-width, initial-scale=1">

  #parse( "partials/scripts.vm" )
  #parse( "partials/css.vm" )

  <script src="$assets/js/vendor/require.js"></script>
  <script>
    #parse( "partials/javascript-dependencies.vm" )
  </script>
  <!-- This link provides CORS support in IE8+ -->
  <!--[if lt IE 10]>
    <script src="${assets}/js/vendor/jquery.xdomainrequest.js"></script>
  <![endif]-->

  #parse( "partials/head-extensions.vm" )
</head>
The key element here is on line 20, where partials/head-extensions.vm is added to the head element. The default contents of head-extensions.vm are:
1
2
## Extension point to add additional content to <head> element
## E.g. additional JavaScript or CSS resources, or analytics
In other words, it adds no content. However, Velocity operates a ‘first found, wins’ rule - if the template engine finds a different version of partials/head-extensions.vm on its load path before the default, it will use that instead. We can use that to load an additional stylesheet, which will override the built-in default CSS rules:
1
2
## Alternate version of head-extensions.vm
<link rel="stylesheet" href="/local-assets/css/site-local.css">
All we have to do now is arrange for this alternative version of head-extensions.vm to be found first. There are various strategies for achieving this: which one suits you will depend on your circumstances. Common choices include:
- defining a Maven assembly goal to pull-together resources from different locations to create a custom assets
.warfile - using a deployment system, such as chef, puppet or capistrano to script the process of putting files where they are needed on a given server, perhaps using a web server such as Apache HTTPD or Nginx to handle static file serving.
For the purposes of this documentation, we will describe a simpler strategy using only Tomcat (or another web application container). Note: this pattern works well for development and prototyping, it may not be suitable for full-scale deployments.
Simple deployment example using Tomcat
Note: these instructions have been tested on a Linux system. They may need to be adjusted for other operating systems.
The default directory for deploying .war files is typically something like /var/lib/tomcat7/webapps. Elda provides two .war files that will allow us to set up a minimal deployment: elda-common.war and elda-assets.war – copying these files to the webapps directory should create two unpacked web applications: elda-common and elda-assets. By default, Elda common will look for configuration files in /etc/elda/conf.d/elda-common.
We also need a location from which Tomcat will serve our local, customised stylesheets and any other assets we need. In the webapps directory, alongside elda-common and elda-assets, we create a directory structure with the following layout:
local-assets
+-- css
|   +-- site-local.css
+-- velocity
    +-- partials
        +-- head-extensions.vm
There’s actually not really a need to keep the Velocity extensions within the Tomcat web application, as they’re not actually going to be served out to browsers. But it’s handy to keep the files together for illustrative purposes in this documentation.
Now that we have a new version of head-extensions.vm that we can have Elda find, it just remains to tell Elda where to look. In the configuration file, we set the _velocityPath
1
2
3
4
5
6
7
8
9
10
11
12
13
14
<myEldaAppSpec> api:defaultFormatter
  [a elda:VelocityFormatter ;
   api:name "html" ;
   api:mimeType "text/html" ;
   elda:className "com.epimorphics.lda.renderers.VelocityRendererFactory" ;
   api:variable [
     api:name "_resourceRoot";
     api:value "/myEldaApp"
   ];
   api:variable [
     api:name "_velocityPath";
     api:value "/var/lib/tomcat7/local-assets/velocity, /var/lib/tomcat7/elda-assets/velocity"
   ]
  ]
With that, Elda will find the alternate head-extensions.vm first, thereby generating a link element that will ask Tomcat for /local-assets/css/site-local.css.
Guide to Velocity template elements
In this section, we outline some of the more commonly overridden elements in the default Velocity templates. This is only a guide: the most definitive reference is to read the Velocity source code in src/main/webapp/velocity in the Elda assets sub-project.
| Element | Filename | Description |
|---|---|---|
index.vm |
Overall page template | |
partials/overrides.vm |
Loaded first, so a good place to add macros or partials that override default definitions | |
partials/scripts.vm |
A place to load JavaScript files that are not loaded via requireJS | |
partials/css.vm |
Loads default CSS stylesheets. Also loads partials/styles-extra.vm, which would be an alternative extension point to the head extensions partial. |
|
partials/javascript-dependencies.vm |
JavaScript files, loaded using requireJS. | |
partials/head-extensions.vm |
Generic extension point for adding content to the head element |
|
partials/title-brand.vm |
Loads the branding (image and title) into the navigation bar | |
partials/item-endpoint.vm |
Defines the body content for an endpoint that presents a single item | |
partials/list-endpoint.vm |
Defines the body content for an endpoint that presents a list of items | |
eldaItem |
macros/item.vm |
Entry point for rendering a single RDF resource as an item in the output |
itemName |
macros/item.vm |
Renders the human-readable name of the resource, picking a suitable label from rdfs:label, skos:prefLabel, etc |
itemProperties |
macros/item.vm |
Renders a list of the properties of an item |
literalValuedNode |
macros/item.vm |
Presents a property value which is a literal value |
resourceValuedNode |
macros/item.vm |
Presents a property value which is a nested RDF resource |
groupVisualExtensions |
macros/item-extensions.vm |
Control point for injecting extended views of a collection of resources, such as a map or chart |
itemVisualExtension |
macros/item-extensions.vm |
Control point for injecting an extended visual presentation of a single item, such as showing a point on an embedded map. |
Example: adding a custom attribute to every item label
Suppose we want every RDF resource to have a unique ID attached via a data attribute. The macro that renders item names is itemName, so we create a copy of partials/overrides.vm somewhere earlier in the _velocityPath (see above). Into this alternate version of overrides.vm, add:
1
2
3
4
5
6
7
8
9
10
11
12
13
## Display the name of the resource
#macro( itemName $resource $h $css $node )
  <div class="$css">
    <$h class="resource-label"
        data-id="$node.uniqueID()"
    >
      $resource.getName()
      #if( $node )
        #actionsMenu( $node )
      #end
    </$h>
  </div>
#end
Most of this version of itemName is directly copied from the default, with just the addition of line 5.
Guide to the Java classes available to the templates
For full details, see the com.epimorphics.elda.renderers.common package in the Javadoc.
TODO expand here.